Crochet Mini Bag Keychain: Complete Step-by-Step Guide
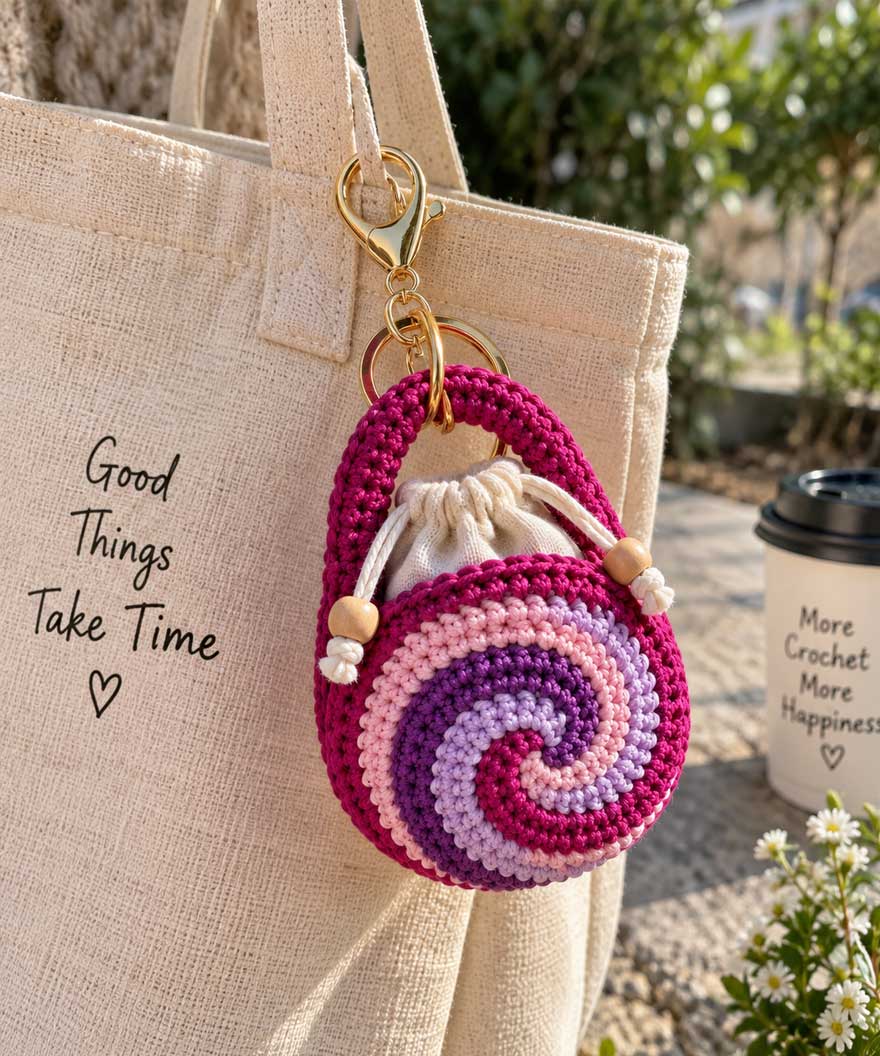
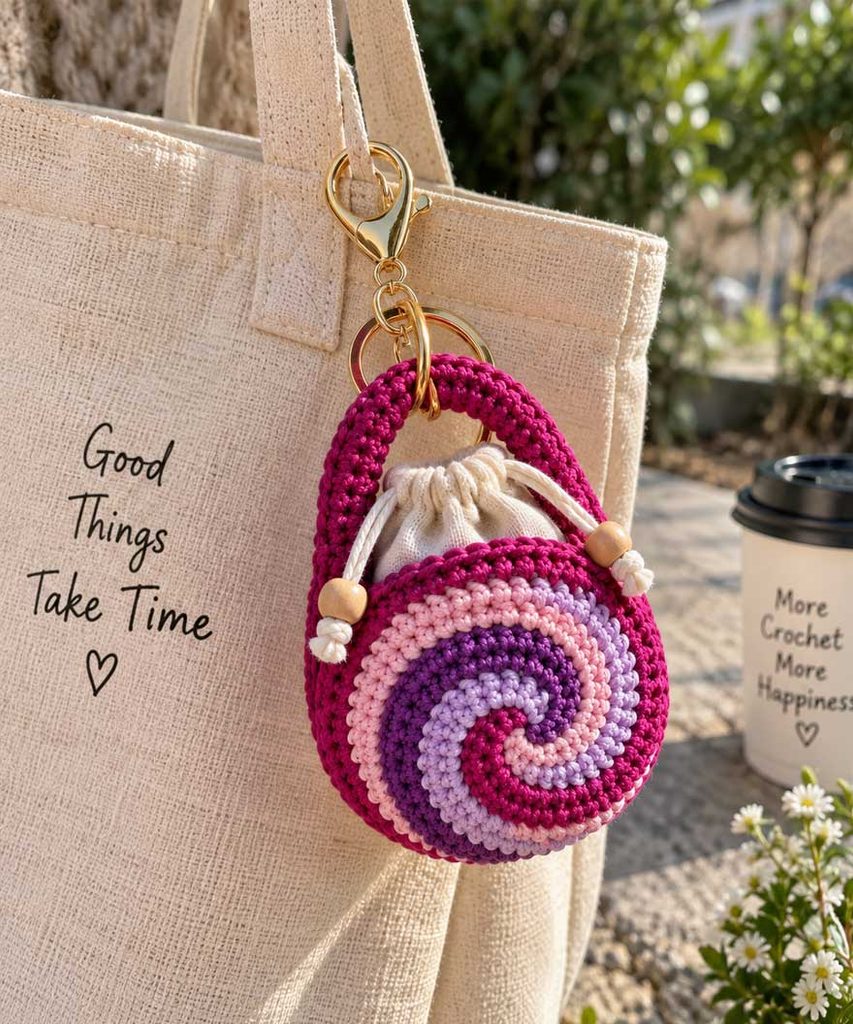
Micro-accessories and bag charms have taken fashion by storm, and learning how to make a mini crochet bag keychain is the ultimate project for crafters of all skill levels. This mini crochet bag keychain features a mesmerizing spiral face motif, a functional inner drawstring pouch, a rigid structural top handle, and elegant gold key-ring hardware.
Whether you want to craft a unique charm for your purse, build an organized holder for wireless earbuds, or create high-margin inventory for your handmade shop, this comprehensive guide walks you through every single step with precision. Below, you will find complete material lists, exact stitch counts, assembly diagrams in text, tension tips, and troubleshooting advice to craft this exact miniature masterpiece.
Mini Crochet Bag Keychain Specifications
Before diving into the pattern, review the project parameters below. Despite its intricate multi-colored swirl appearance, this project relies on basic stitches combined with continuous spiral color techniques.
| Parameter | Specification |
|---|---|
| Skill Level | Confident Beginner to Intermediate |
| Finished Diameter | 6.5 cm – 7.5 cm (2.5 in – 3.0 in) |
| Total Height (With Handle) | 10 cm – 11 cm (3.9 in – 4.3 in) |
| Working Time | 1.5 to 2.5 hours per keychain |
| Key Techniques | Spiral motif work, BLO/FLO stitches, seamless seaming, hardware mounting |
Required Tools & Materials
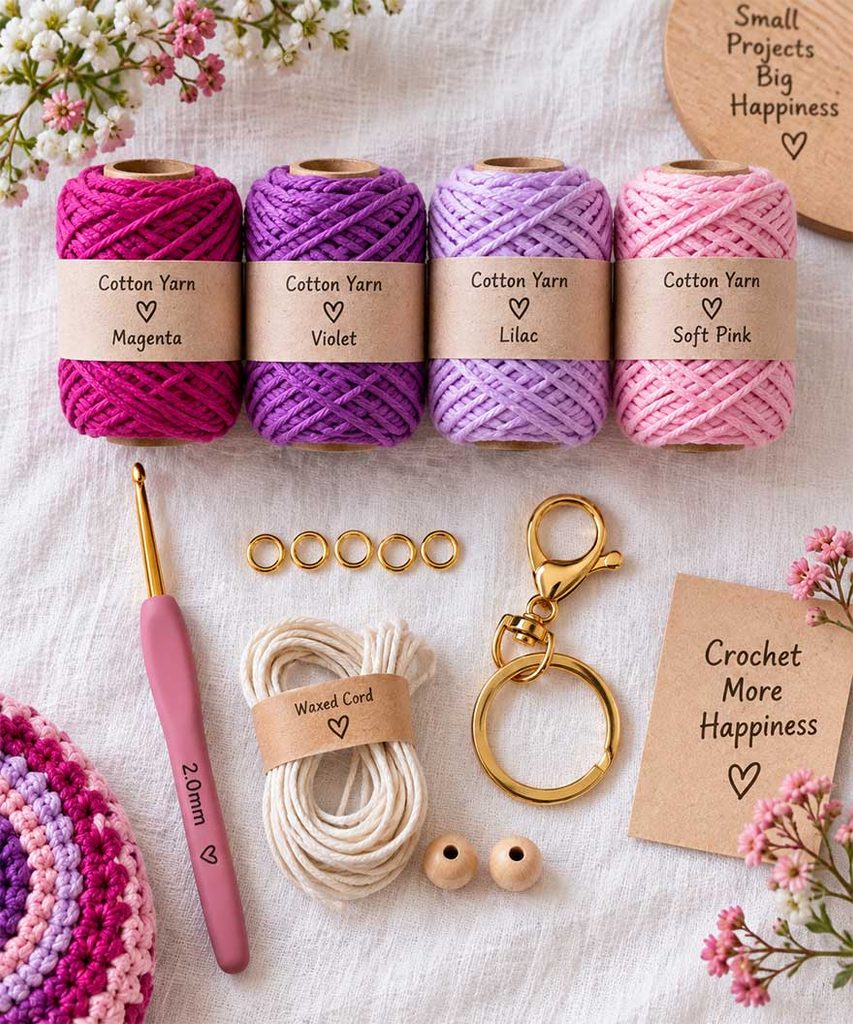
Working on a miniature scale requires specific yarn and hook choices to maintain rigid structure without sacrificing stitch definition. Avoid floppy, soft acrylics for this project.
- Yarn / Cord:
- Swirl Faceplates: 1.5mm–2.0mm mercerized cotton yarn or fine cotton cord in 3 to 4 contrasting colors (e.g., Magenta, Violet, Lilac, Pink). You will need approximately 10–15 meters of each color.
- Inner Drawstring Pouch: Fine 1.5mm cotton yarn in neutral beige, tan, or cream.
- Crochet Hook: 2.0 mm or 2.25 mm ergonomic steel/aluminum hook. (Select a size smaller than recommended on yarn labels to ensure dense, gap-free fabric).
- Hardware:
- 1 Gold swivel lobster clasp or key-ring with a 4–5 link chain extension.
- 2 Small gold jump rings (6mm–8mm).
- Drawstring Cord & Hardware: 1mm waxed cotton cord (30 cm length) and 2 tiny wooden or gold accent beads for cord ends.
- Notions: Fine tapestry needle, 4 mini stitch markers, sharp thread scissors, and fabric glue or textile stiffener (optional for handles).
Understanding the Mini Crochet Bag Keychain Architecture
To ensure your finished keychain matches the precise structure shown in the reference photo, it is important to understand how the four distinct components fit together:
- The Swirl Discs (Front & Back): Two identical circular motif plates made by carrying multiple yarn colors continuously in a spiral sequence.
- The Inner Drawstring Pouch: A compact, flexible cylindrical pouch sewn between the two outer plates. The top gathers with a drawstring cord to keep small items secure.
- The Rigid Handle Arch: A dense, semi-circular wrapped handle worked over a sturdy foundation loop that spans the top rim of the bag.
- The Hardware Anchor: A gold jump ring and chain assembly secured precisely at the central apex of the arched handle.
Crochet Abbreviations & Stitch Key (US Terminology)
- Ch: Chain
- Sc: Single Crochet
- Hdc: Half Double Crochet
- Dc: Double Crochet
- Sl St: Slip Stitch
- Inc: Increase (2 single crochet stitches in the same stitch)
- MR: Magic Ring
- BLO: Back Loop Only
- FLO: Front Loop Only
- St(s): Stitch(es)
How to Crochet a Mini Bag Keychain: Step-by-Step Instructions
Part 1: Crafting the Spiral Swirl Motifs (Make 2)
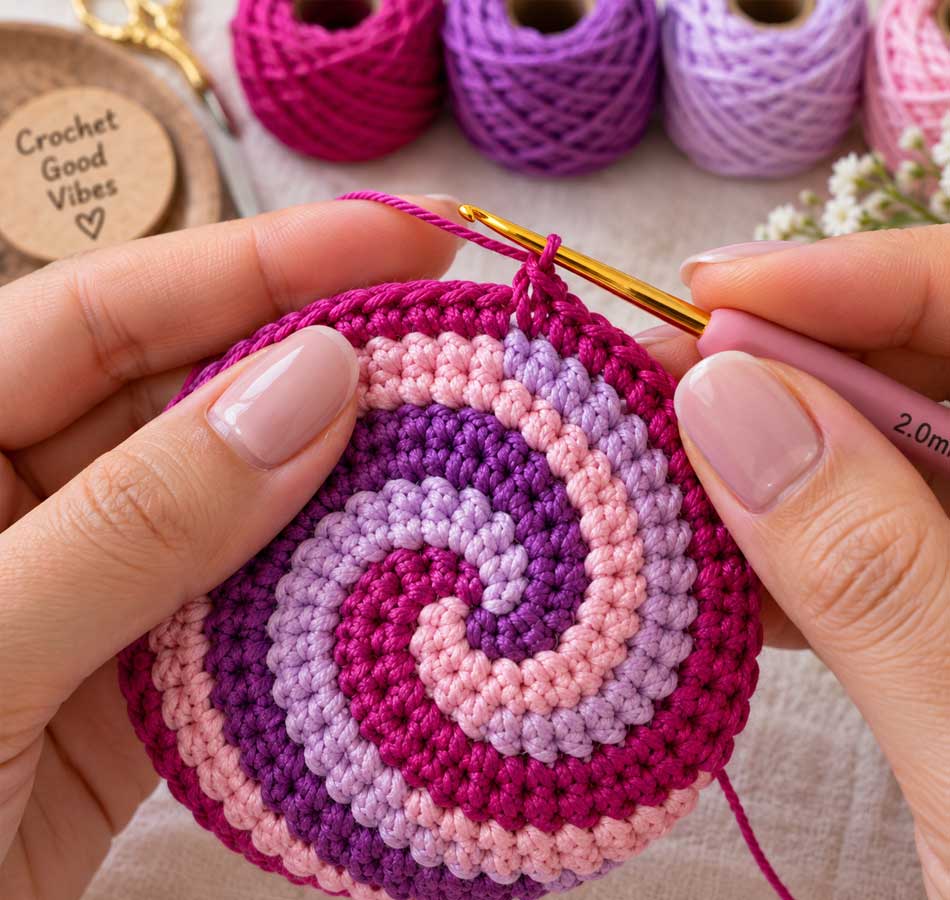
The signature element of this mini crochet bag keychain is the multi-colored swirl disc. This motif uses 4 working strands of yarn simultaneously in a magic ring. Choose 4 distinct colors (Color A, Color B, Color C, Color D).
Round 1 (Setting Up the 4-Color Magic Ring):
- Form a Magic Ring.
- Color A: Attach into MR, Ch 1, 1 Sc, 1 Hdc into the ring. Drop loop (place stitch marker in loop to prevent unraveling).
- Color B: Attach into MR next to Color A, Ch 1, 1 Sc, 1 Hdc into the ring. Drop loop.
- Color C: Attach into MR next to Color B, Ch 1, 1 Sc, 1 Hdc into the ring. Drop loop.
- Color D: Attach into MR next to Color C, Ch 1, 1 Sc, 1 Hdc into the ring. Drop loop.
- Gently pull the magic ring tail to close the center ring snugly. (Total: 8 working stitches across 4 colors).
Round 2 (Expanding the Swirl Gradient):
- Pick up Color A loop: Work [1 Hdc, 1 Dc] in the two stitches made by Color B ahead of it. Drop loop.
- Pick up Color B loop: Work [1 Hdc, 1 Dc] in the two stitches made by Color C ahead of it. Drop loop.
- Pick up Color C loop: Work [1 Hdc, 1 Dc] in the two stitches made by Color D ahead of it. Drop loop.
- Pick up Color D loop: Work [1 Hdc, 1 Dc] in the two stitches made by Color A ahead of it. Drop loop.
Round 3 (Establishing Flat Diameter Increase):
- Color A: Work 2 Dc into the next st, 1 Dc in following st. Drop loop.
- Color B: Work 2 Dc into the next st, 1 Dc in following st. Drop loop.
- Color C: Work 2 Dc into the next st, 1 Dc in following st. Drop loop.
- Color D: Work 2 Dc into the next st, 1 Dc in following st. Drop loop.
Round 4 (Final Expansion & Tapering Edges):
- For each color strand in succession: Work [1 Dc, 1 Hdc, 1 Sc, 1 Sl St] across the next 4 stitches ahead to smoothly taper the height of the spiral back down to the edge.
- Cut yarn tails leaving a 15 cm tail for weaving. Pull all working loops through.
- Use an invisible join / needle join on each color tail to create a perfectly smooth outer circle rim.
- Repeat Part 1 to create the second identical swirl motif. Block both discs flat using a light steam iron or damp blocking pins.
Part 2: Constructing the Inner Drawstring Pouch
The internal pouch holds items safely inside the open-sided swirl frame. Work this section in a solid neutral shade (tan, cream, or beige cotton).
- Foundation Base: Work 6 Sc into a Magic Ring. (6 sts)
- Round 1 (Inc Round): Inc in every stitch around. (12 sts)
- Round 2: [Sc 1, Inc] repeat around. (18 sts)
- Round 3: [Sc 2, Inc] repeat around. (24 sts)
- Round 4: [Sc 3, Inc] repeat around. (30 sts) — Matches the base diameter of the swirl disc.
- Round 5 (Wall Transition – BLO): Sc in the Back Loop Only of each st around. (30 sts)
- Rounds 6–12 (Pouch Walls): Sc in both loops around continuously for 7 rounds. (30 sts)
- Round 13 (Eyelet Round for Drawstring): [Ch 1, skip 1 st, Sc in next st] repeat 15 times around. This creates 15 small eyelet holes along the top rim.
- Round 14 (Top Border): Sl St in each ch-space and stitch around. Fasten off and weave in ends.
Threading the Drawstring:
Cut two 25 cm lengths of waxed cord. Thread the first cord through the eyelet round starting from the left side, looping all the way around and exiting at the same side. Thread the second cord starting from the right side, looping around and exiting on the right. Slide a small wooden bead onto each pair of cord ends and tie a secure overhand knot.
Part 3: Joining the Outer Plates and Inner Pouch
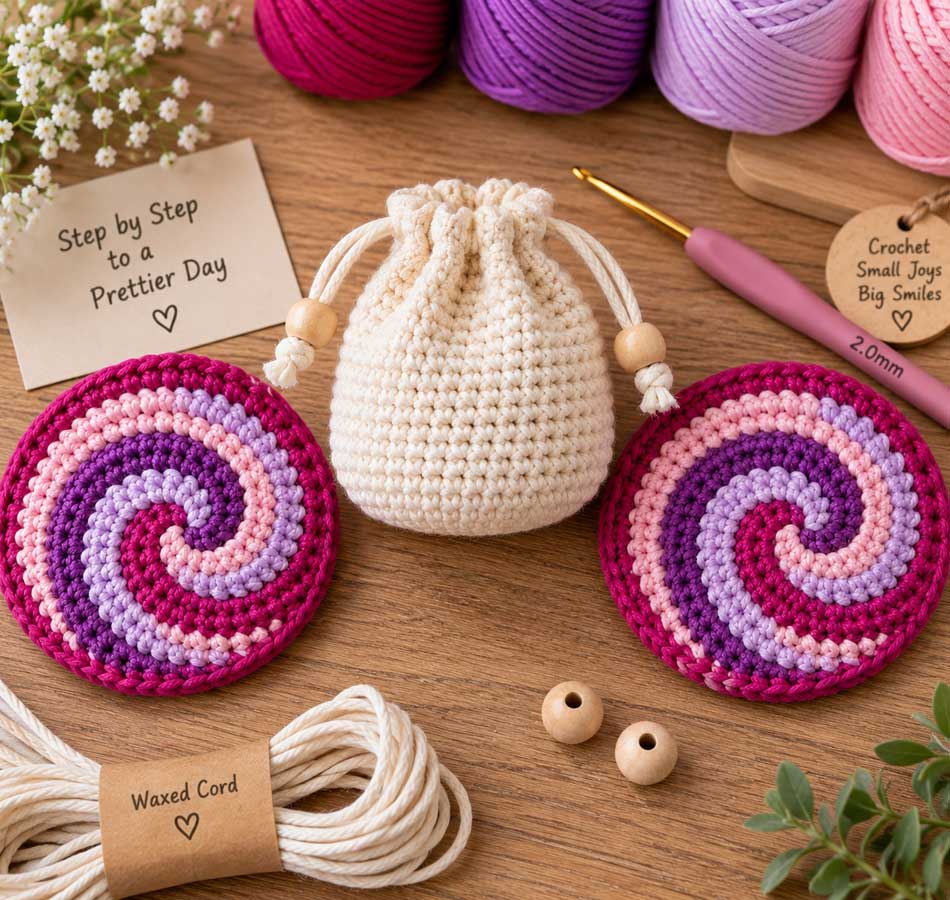
Now assemble the main bag structure by sandwiching the inner pouch between the two spiral faceplates.
- Position the front swirl disc over the front of the inner pouch and the back swirl disc over the rear. Align the lower bottom curves.
- Using main body yarn and a 2.0mm hook, join yarn at the upper right side (approx. 10 o’clock position).
- Work single crochet stitches through both loops of the outer disc AND the exterior loop of the inner pouch simultaneously, working around the lower curve to the 2 o’clock position.
- Leave the upper top third of the pouch open so the drawstring function remains accessible.
- Fasten off cleanly and weave ends into the interior seam layer.
Part 4: Forming the Structural Top Handle Arch
A limp handle will ruin the realistic miniature handbag look. Follow this technique to build a stiff, perfectly rounded arch top handle.
- Foundation Chain: Rejoin yarn at the top left edge of the front disc opening. Chain 18 stitches loosely to form an arch spanning across to the top right edge. Secure with a Sl St.
- Turn & Reinforce: Turn your work and single crochet 18 stitches back across the chain.
- Thick Cord Wrap (Round 2 over handle): Work 22 Single Crochet stitches directly over the arch structure itself (inserting hook under the entire handle bar rather than into individual chains). This wraps the handle in a dense, ridged column that naturally curves into a rigid semi-circle.
- Repeat the handle creation process on the back disc if making dual handles, or connect both discs under one unified thick arch handle as seen in the reference image.
Part 5: Hardware Mounting & Final Polish
- Attaching Keyring: Open a 7mm heavy-gauge gold jump ring using jewelry pliers.
- Pass the jump ring directly through the center top stitch of the arched handle loop.
- Attach the lowest link of your gold chain and keyring assembly onto the jump ring.
- Close the jump ring tightly, ensuring no gap remains for thread to slip through.
- Shape Set: Lightly spray the finished handle with fabric stiffener or diluted PVA glue, shape the round handle with your fingers, and allow it to dry completely for 2 hours.
Color Palette Combinations
The visual impact of your finished mini crochet bag keychain comes from thoughtful color grouping. Below are four proven color palettes modeled directly after popular handmade variations:
| Palette Name | Color 1 | Color 2 | Color 3 | Color 4 |
|---|---|---|---|---|
| Berry Blast | Magenta | Deep Violet | Lilac | Soft Pink |
| Rainbow Swirl | Sunshine Yellow | Tangerine | Teal Green | Electric Purple |
| Ocean Breeze | Deep Navy | Royal Blue | Turquoise | Cream White |
| Sunset Glow | Burgundy | Coral Pink | Golden Yellow | Peach |
Expert Tips for Perfect Miniature Execution
Pro Tip on Tension: When making a mini crochet bag keychain, stitch consistency matters twice as much. Keep your working yarn pulled tight against the hook throat. If your swirl discs tend to cup or bowl inward, upgrade to a 0.25mm larger hook for Round 3 only, then return to your primary hook size for edging.
- Preventing Color Gaps: When dropping and picking up multi-color strands in Part 1, carry the non-working strands along the back of the work loosely. Do not pull dropped strands too tightly, or the circular disc will buckle.
- Invisible Ends: Always finish color rounds with a needle-assisted invisible join instead of a standard slip stitch to avoid creating noticeable bumps along the outer perimeter.
- Reinforced Keyring Attachment: Never attach the keyring chain directly to a single strand of yarn. Always anchor the jump ring under at least two stitch loops to distribute weight safely when keys are hanging.
Troubleshooting Common Mistakes
1. My Swirl Disc Is Waving at the Edges
Wavy or ruffled edges mean you have added too many increase stitches for your yarn gauge. Skip the increase in every 4th stitch on Round 3 and work plain stitches instead.
2. The Inner Pouch Is Visible Beyond the Swirl Faceplates
If the neutral pouch sticks out along the lower edges, your pouch diameter is larger than your outer plates. Simply stop your pouch base at Round 3 (24 stitches instead of 30) before working the vertical wall rounds.
3. The Handle Flops Over Instead of Standing Upright
To fix a limp handle without remake, insert a 1mm piece of flexible plastic wire or coated jewelry wire inside the center of the handle stitches while wrapping your single crochets around it in Part 4.
Starfish Crochet Pattern – Easy Free Pattern for Beginners
Frequently Asked Questions (FAQ)
Q: What is the best yarn type for a mini crochet bag keychain?
A: 100% mercerized cotton yarn (size 3 or 10 crochet thread) or 1.5mm cotton macrame cord is ideal. Cotton offers crisp stitch definition, zero fuzziness, and built-in stiffness necessary for structured keychains.
Q: Can I fit items inside this keychain bag?
A: Yes! The inner pouch is fully functional. It comfortably holds coins, folded cash, small lip balms, or wireless earbud charging cases (like standard AirPods).
Q: How long does it take to make one keychain?
A: For an intermediate crocheter, assembly takes approximately 1.5 to 2 hours. Once comfortable with the 4-color spiral sequence, batch-making parts can reduce production time to under an hour per piece.
Q: How do I clean and wash the keychain?
A: Spot clean gently using a soft toothbrush dipped in cold water and mild liquid soap. Do not submerge metal hardware in water to prevent tarnishing. Air dry flat.
Final Finishing Checklist
- [ ] All yarn ends tightly woven and secured on the interior faceplate sides.
- [ ] Drawstring cords glide smoothly through top pouch eyelets.
- [ ] Wooden beads secured with tight overhand knots at cord ends.
- [ ] Top handle arch stiffened and symmetrically centered.
- [ ] Gold jump ring completely closed around handle center with keyring firmly attached.
Your handmade mini crochet bag keychain is now complete and ready to attach to your favorite tote, car keys, or gift to someone special!